Friday, 19 May 2017

Crumpets.

Crumpets recipe: From David Lebovitz.

A crumpet is a griddle cake made from flour and yeast.
An early reference to them comes from English Bible translator John Wycliffe in 1382 when he mentions the "crompid cake".

Their shape comes from being restrained in the pan/griddle by a shallow ring.

They have a characteristic flat top with many small pores and a chewy and spongy texture.

English crumpets are generally circular, roughly 8 centimetres (3 in) in diameter and 2 centimetres (3⁄4 in) thick.
OR:
- Crumpets Recipe | King Arthur Flour:

- Crumpet, muffin, pikelet and farl recipes | Hugh Fearnley-Whittingstall | Life and style | The Guardian:
'via Blog this'

Wednesday, 17 May 2017

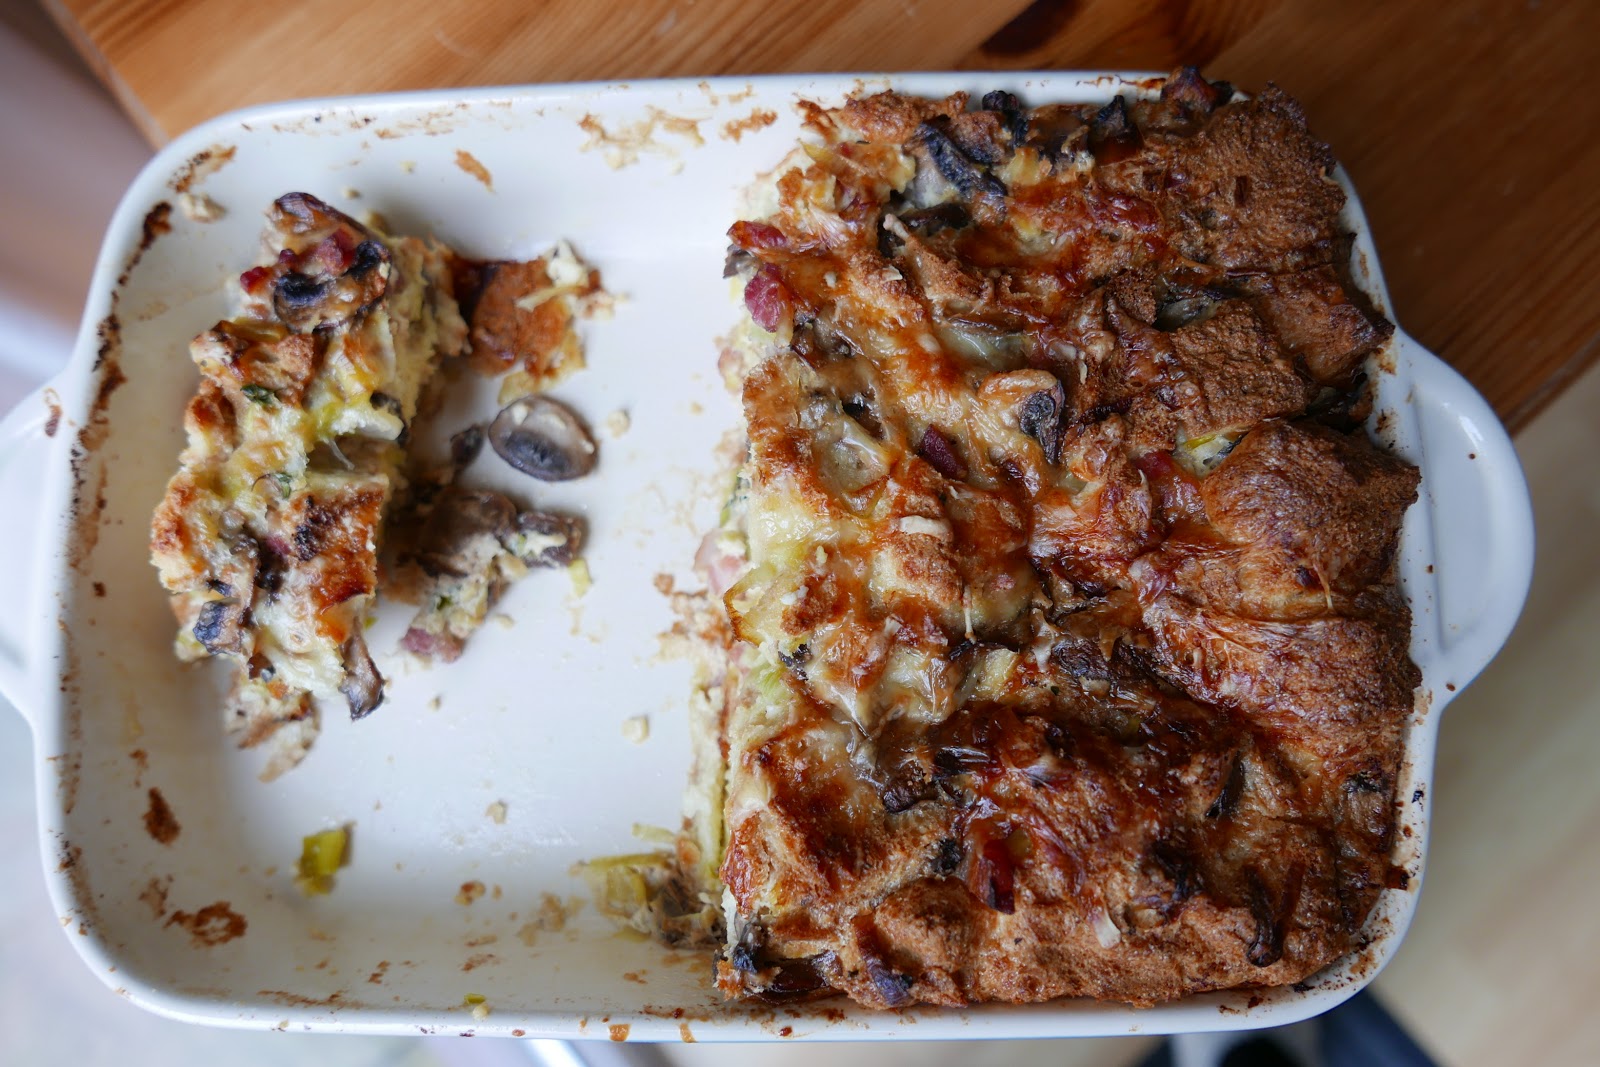
Savory bread pudding with wild mushrooms & bacon.


You’ll need:
Unsalted butter, for the baking dish
8 oz/225g country-style bread, preferably day-old
8 oz/225g thick cut bacon, cut into 1/4-inch pieces
2 small or 1 large/110g leek, white and light green parts sliced 1.2 inch/12mm thick and rinsed (I used green onions)
2 Tbsp olive oil, as needed
1 lb/455g mixed wild mushrooms, sliced 1/4 inch thick (I used a mix of shiitake and cremini)
1/2 cup grated Parmesan cheese
1/3 cup flat leaf parsley, chopped
2 tsp fresh thyme leaves
1/2 tsp sea salt
6 large eggs
2 cups/480 ml whole milk
1 cup/240 ml heavy cream
1/4 cup/25 g grated Gruyere, Comte, or other firm cheese
Ground black pepper

Directions
Preheat the oven to 350 degrees F/180 degrees C.
Butter inside surfaces of a 9-inch/23 cm square baking dish with at least 2-inch/5cm sides.
Cut the bread into 1-inch/2.5 cm cubes.
Spread them out on a baking sheet and place in the oven to toast for a few minutes, until lightly toasted.
Set aside.
In a skillet over medium-high heat, cook the bacon until slightly crisped but not yet bully browned.
Transfer to a large bowl and pour off all but 2 Tbsp of fat from the skillet.
Add the leeks to the skillet and cook over medium-high heat, stirring often, until soft, 3 to 5 minutes.
Transfer to the bowl with the bacon.
If the pan looks dry, swirl in 1 Tbsp of the olive oil.
Add about half of the mushrooms and saute, stirring occasionally, until crisp and lightly browned in a few places, 3 to 5 minutes.
Transfer the mushrooms to the bowl and cook the remaining mushrooms, adding as much of the remaining 1 Tbsp of oil to the skillet as needed.
Transfer to the bowl and let cool.
Add the cheese, parsley, thyme, and salt to the cooked mushroom mixture and mix well.
In another bowl, whisk together the eggs, milk, and cream until well blended.
Pour over the mushroom mixture and stir to combine.
Gently mix in the toasted bread cubes.
Carefully pour the bread mixture into the prepared baking dish.
The custard should come right up to the top but not cover the highest cubes of bread.
(If you have extra, fill a buttered ramekin and make an additional, smaller bread pudding (note from Sarah: I had extra)).
Scatter the additional cheese evenly over the pudding and grind a light dusting of pepper on top.
Bake until the custard is no longer runny but still a bit wobbly in the center, 40 minutes to 1 hour (and about 25 minutes for a smaller ramekin).
It will continue to cook as it sits before serving.
Serve the bread pudding hot or at room temperature.
Any leftovers can be stored, well wrapped, in the refrigerator for up to 3 days and reheated, covered with aluminum foil, in a 350 degree F/180 degree C oven.

- http://casayellow.com/2017/04/19/savory-bread-pudding-with-mushrooms-bacon/
OR:
- Savory Vegetable Bread Pudding From 'The Beekman 1802 Heirloom Vegetable Cookbook' | Serious Eats:

Monday, 15 May 2017

Apricot Cornmeal and Buttermilk Clafoutis.

- Apricot Cornmeal and Buttermilk Clafoutis – REAL SIMPLE FOOD:
If you want to replace the apricots with very juicy fruits like cherries or blueberries, increase the eggs to 6 to ensure the clafoutis will still set.

Ingredients
4 eggs
50g honey
Pinch of salt
300ml buttermilk
50g polenta
500g apricots, halved with the stone removed

Directions
Pre-heat the oven to 200 degrees Celsius and grease a pie dish generously with butter.
In a large mixing bowl whisk the eggs and honey until the frothy.
Pour in the buttermilk and whisk to combine.
Lastly, fold in the polenta and the pinch of salt.
Pour the batter into the pie dish and carefully sit the halved apricots, cut side up, in the batter.
Place in the oven and bake for 35 minutes or until the clafoutis is puffed up and the centre is just set.

The clafoutis will keep in the fridge for 3-4 days.
'via Blog this'

Honey Mustard Chicken And Potato Bake.

Honey Mustard Chicken And Potato Bake | Donna Hay:
Serves 4.
Ingredients
1 tablespoon extra virgin olive oil
4 chicken marylands (1kg)
sea salt and cracked black pepper
250g streaky bacon, thinly sliced
600g chat (baby) potatoes, halved
1 cup (250ml) single (pouring) cream
⅓ cup (95g) honey mustard
1 cup (250ml) water
6 sprigs thyme
Method
Preheat oven to 200°C (400°F).
Heat the oil in a large flameproof, ovenproof frying pan over high heat.
Sprinkle the chicken with salt and pepper and cook for 4 minutes each side or until golden.
Remove from the pan and set aside.
Add the bacon and potato to the pan and cook for 6 minutes or until golden.
Add the cream, mustard and water and return the chicken to the pan.
Bring to a simmer and cover with a lid.
Cook in the oven for 10 minutes.
Remove the lid, add the thyme and cook for a further 10 minutes or until chicken is golden and potato is cooked through.
Serve.

I will be making it again!
Buy Lidl's or Sainsbury's Heinz Yellow Honey Mustard

OR DIY:
Ingredients
1 tbsp French mustard
1 tbsp honey
1 clove garlic, peeled and crushed
1 tsp balsamic vinegar
2 tbsp cider vinegar
6 tbsp sunflower oil
salt and pepper, to taste
Method
Put the mustard, honey, garlic, balsamic and cider vinegar in a food processor and whiz together.
With the motor still running, pour the oil in through a funnel.
Season with salt and pepper and serve.


OR similar recipe:
Honey Mustard Chicken & Potatoes (One Pan) - Cafe Delites:
Preheat oven to 200°C | 400°F.
Generously season chicken thighs with salt, pepper and garlic powder.
Heat olive oil in a large, oven-proof non stick pan (or a well-seasoned cast iron skillet) over medium-high heat.
Sear chicken thighs for 3 minutes each side, until the skin becomes golden and crisp.
Leave 2 tablespoons of chicken juices in the pan for added flavour, and drain any excess.
Fry the garlic in the same pan around the chicken for 1 minute until fragrant.
Add the honey, both mustards, and water to the pan, mixing well, and combine all around the chicken.
Add in the potatoes; mix them through the sauce.
Season with salt and pepper, to your tastes.
Allow the honey mustard sauce to simmer for two minutes, then transfer to the hot oven and bake for 40-45 minutes, or until the chicken is completely cooked through to the bone and no linger pink in the middle.

Optional: Remove from the oven after 30 minutes; add in the green beans (mixing them through the sauce), and return to the oven to bake for a further 15 minutes, or until the chicken is completely cooked through and no longer pink in the middle, and the potatoes are fork tender.
OR:
- Honey Mustard Chicken Recipe | Gousto:
Have fun with pictures!

Tuesday, 9 May 2017

Sweetness of Spring: Strawberry Clafoutis.

Sweetness of Spring: Strawberry Clafoutis : NPR:
Clafoutis is the epitome of the French grandmotherly dessert: unpretentious, easy to make, and blissfully comforting.

– 55 g unsalted butter
– 600 g fresh strawberries (I added Rhubarb!)
– 60 g all-purpose flour
– 50 g whole blanched almonds
– 100 g granulated sugar
– 1 tablespoon cornstarch
– A pinch of salt
– 3 large eggs
– 185 ml milk
– 1 tablespoon dark rum (optional)
– Confectioner’s sugar
Oven temperature: 180°C

Coulis:
– 200g fresh strawberries
– 2 tablespoons sugar
– 2 tablespoons water

Preheat the oven to 180°C/350F and grease an 20cm/8-inch-square glass or ceramic baking dish (or 6 1-cup ramekins for a more elegant presentation) with one tablespoon of the butter.
Melt the remaining butter in a small heavy-bottomed saucepan over medium heat (or in a small bowl set in the microwave for a few seconds) and set aside.

Rinse the strawberries under cool water — do not soak or they will loose some of their flavor.
Drain in a colander for a few minutes, and gently pat dry with a clean dishtowel.

In a food processor or blender, mix together the flour and almonds until finely ground.
Add the sugar, cornstarch and salt, and mix again.
Crack in the eggs one by one, mixing thoroughly after each addition.
Pour in the melted butter, milk and rum if using, and mix again until well blended.
The mixture will be thin, like crepe batter.

Hull the strawberries, cut in halves or quarters depending on their size, and arrange in a single layer in the prepared dish or ramekins.
Drizzle the batter over the strawberries, and put the dish in the oven to bake for 40 minutes (30 minutes if you use ramekins), until puffy and set.

Transfer dish to a rack, and let cool to room temperature.
Sprinkle with confectioner’s sugar, and serve directly from the baking dish or ramekins.
Clafoutis is traditionally served on its own, but if you like you can add a few fresh strawberries on the side, a scoop of vanilla ice cream, or a little whipped cream.

Strawberry Coulis
1 cup fresh strawberries, rinsed and patted dry
2 tablespoons granulated sugar
2 tablespoons water

Hull and quarter the strawberries.
Combine with the sugar and water in a food processor or blender, and mix in short pulses until smooth. Pour into an airtight container, and cover.
Refrigerate for up to a day, or freeze for up to a month.

'via Blog this'

Sunday, 7 May 2017

Classic Russian Kefir Crepes.


Ingredients:
2 cups Kefir
2 eggs
1 1/2 cup all-purpose flour
1/2 tsp salt
1 tsp sugar
1/2 tsp baking soda
1 cup boiling water
4 tbsp oil
butter for greasing

In a medium pot whisk together Kefir, eggs, salt and sugar. Heat the mixture so it’s warm (not hot) to the touch, about 2-3 minutes, whisking constantly.
Then take it off the heat, pour it into the medium bowl and sift in the flour.
Whisk everything to combine.
The batter is going to get pretty thick, but don’t worry we will dissolve it with hot water later.
Once everything is mixed, add baking soda to 1 cup of boiling water and slowly pour it into the batter whisking constantly.
Add oil and mix once more.
Preheat 2 non-stick pans over medium-high heat and grease it with a little knob of butter.
I prefer to use 2 skillets at the same time as it makes things go much faster.
When the pans are hot, working one at a time, pour in about 1/4-1/3 cup of batter, depending on the size of your pan, into one side of the pan and swirl it quickly to cover the entire pan with a thin layer of batter.
When the top of the crepe has no more wet spots and edges turn crispy, run the spatula underneath the edges of the crepe, then lift it with hands or spatula and flip it over. Cook for another 30 seconds and remove to a plate.
Reduce heat to medium and continue cooking crepes until no more batter remains greasing the pan with butter before each crepe.
Stack cooked crepes one on top of each other and serve.
These crepes can be served with either sweet or savory condiments.

From gastrosenses.com

Monday, 1 May 2017

Exotic citrus fruits.

- Beautiful bergamots: The fruit is the chefs' citrus of choice this spring | The Independent:
Beautiful bergamots.
What is a bergamot?
Often seen in essential-oil form in Earl Grey tea and beauty products, bergamot citrus fruits are grown in Southern Italy and look like lemons.
They are a seasonal variety with a short growing window.
Use their zest and juice as an ingredient to add a new twist to your gin and tonic, salad dressings or marinades.
- See more at: http://waitrose.pressarea.com/pressrelease/details/78/PRODUCT%20NEWS_12/6005#sthash.uYNR7dnh.dpuf

More exotic citrus fruits to try
CEDRO
I'd always known cedro as etrog lemon, an essential part of Jewish Sukkot rituals, and was bemused to come across a Yiddish expression for something that has no value as being like "an etrog after Sukkot". How very misguided. Its elongated lemon shape is awesome – sometimes as large as a melon – with a textured yellowy-green skin. Cedro has an exceptionally large ratio of soft, white, surprisingly sweet pith that can be used with the bitter-sweet, prized rind. In Sicily, where cedros are grown, it is thinly sliced and sprinkled with salt or sugar as a snack with aperitifs (or candied) or combined with fennel in a salad.

DIAMANTE CITRON
Chris Golding at Apero at The Ampersand is another chef who takes great pleasure in using ingredients that are a talking point for guests. He uses diamante citron, sweeter than a conventional lemon and similar to a cedro. He adds its juice besides lemon to cure wild sea bass served with fennel and purple potatoes.

BUDDHA'S HAND
A fragrant citron whose fruit is segmented into finger-like sections. The origin of Buddha's hand is north-eastern India and China though it is now grown in California. It has no juice and is mainly valued for its zest. The inner white pith is not bitter so the fingers can be longitudinally sliced, peel, pith, and all, and used in salads. Not least by Michel Roux Jnr at Le Gavroche in a crab salad with spring onions, roasted hazelnut oil and spicy tomato mousse.

SHATKORA LEMON
Indian citrons identifiable by their large "wings" on the stalk attaching the leaf to the stem, they have smooth yellow rind, dry, greenish-yellow flesh and a very sour, bitter juice. At Trishna, segments of Shaktora lemon are added to give extra verve to a masala chicken curry.

LIMEQUAT
Tiny round citrus related to both kumquat and lime. Look for the more yellow-skinned limequat as its intense sourness and tartness is more mellow. Use sparingly in dressings and desserts. Sometimes seen in larger branches of Sainsbury's.

FINGER LIME
The ultimate, decadent citrus burst, often called lime caviar as the interior pulp has a caviar-like appearance and pops and bursts on the roof of the mouth, exploding with vivid lime flavour. Wonderful as a seafood garnish and relatively less expensive than caviar though still a huge treat. Available from efoodies.co.uk

- Bergamot Polenta Cake – Life Love Food:
BERGAMOT POLENTA CAKE.
1 fresh unwaxed bergamot
3 large eggs
180g caster sugar
125g fine polenta (such as Fioretto)
250g ground almonds
2 teaspoons baking powder
Pinch of sea salt
140g unsalted butter, softened, plus more for the tin
Icing sugar, for dusting

Wash the bergamot thoroughly, place it in a saucepan and cover it with cold water. Set it over a medium heat and bring to the boil. Simmer for about one hour, or until the bergamot is tender all the way through, topping up the water if the level drops too much – the fruit should be bobbing in plenty of liquid at all times. Drain the bergamot and discard the seeds. Purée flesh and skin in a blender until smooth.

Next, preheat the oven to 180°C and butter a 20cm springform cake tin. Set aside.

In a large bowl, whisk the eggs with the sugar until airy and pale yellow. Add the puréed bergamot and fold through. In a separate bowl, combine polenta, ground almonds, baking powder and salt. Add the butter and work it into the dry mix until completely broken through. Finally, pour over the eggs and sugar and stir until you have an even mixture.

Pour the batter into the prepared cake tin and level the surface. Bake for 40 minutes, or until a skewer comes out clean. Remove the cake from the oven and leave it to cool in the tin for about 20 minutes, then free it from the springform and transfer it to a rack to cool completely. Dust the surface with icing sugar before serving.

OR:
- Whipped Lime Pie | The Miller's Daughter:

- Bergamot and cedro marmalade | The Independent

'via Blog this'

Rhubarb pickle.

- Life Love Food – A Recipe Journal by Venetian Food Writer Valeria Necchio:
- Rhubarb pickle recipe - Telegraph:
This pickle works wonders with oily fish like mackerel or sardines, either smoked or grilled, as its acidity will cut through the fat and create a nice contrast of textures.
INGREDIENTS
500g rhubarb stalks (4 large stalks)
2 tsp peppercorns
½ tsp cloves
1 tbsp sliced fresh ginger
3 bay leaves
2 dry red chillies
250ml (1 cup) apple cider vinegar
250ml (1 cup) water
200g (1 cup) caster sugar
½ tsp fine grain salt
METHOD
Line two sterilised pint jars with lids.
Rinse the rhubarb stalks, scrubbing any residual soil, and trim the leaves and brown ends.
Cut into 2-cm long pieces and pack them into the two jars. Divide the rest of the spices between the two jars, then set aside.
In a small saucepan, combine the cider vinegar, water, sugar and salt and bring to a boil.
Whisk often to help dissolving the sugar and salt.
As soon as the pickling liquid is boiling and the sugar and salt are dissolved, pour it into the jars until the liquid covers the rhubarb pieces.
Close immediately with the sterilised lids.
Allow to cool before storing in the refrigerator.
Let the rhubarb pickles cure for at least 48 hours before eating, then enjoy within two weeks from opening.

- In a Pickle: Pickled Rhubarb Stalks | Serious Eats:
Any variety of rhubarb works for this recipe.
Don't avoid the pale green stalks, they may not look as pretty in the jar, but they make up for it in good texture and flavor.
If you like a less sweet pickle, feel free to reduce the amount of sugar in this recipe by up to half.
I like the balance that it achieves as written, but the beauty of making your own pickles is that you can adjust the flavors to suit.
INGREDIENTS
1 pound rhubarb stalks (4 to 6 large stalks)
1 cup apple cider vinegar
1 cup water
1 cup granulated sugar
1/2 teaspoon fine grain salt
2 teaspoons mustard seeds
1/2 teaspoon black peppercorns
1/2 teaspoon whole cloves
2 star anise
DIRECTIONS
1.Prepare two wide mouth pint jars and lids.
2.Wash rhubarb stalks well and trim to fit into the jars.
If the stalks are broad, slice them into lengthwise sections.
In a small saucepan, combine the apple cider vinegar, water, sugar and salt and bring to a boil.
3.Divide the mustard seeds, peppercorns, cloves and star anise between the two prepared jars.
Pack the rhubarb pieces into the jars above the spices.
4.Once the pickling liquid has boiled and the sugar and salt are dissolved, pour it into the jars over the rhubarb, leaving 1/2 inch headspace.
Tap the jars gently to dislodge any air bubbles.
If the headspace level has dropped significantly, add more pickling liquid.
5.Wipe jar rims, apply lids and rings and process jars in a boiling water bath canner for 10 minutes.
When time is up, remove jars from canner and set them to cool on a folded kitchen towel.
When jars are cool enough to handle, remove rings and test seals.
If jars are at all sticky, wash them to remove that residue.
Sealed jars can be stored in the pantry for up to 1 year.
Unsealed jars can be stored in the refrigerator and eaten within 2 weeks.
6.Let this pickle cure for at least 48 hours before eating.

- pickled rhubarb | Punk Domestics:
Sweet Rhubarb Pickles
I used four large stalks of rhubarb
Start by peeling the rhubarb
then cut each stalk into thirds.
Combine
1/4 tsp of vanilla,
3/4 c brown sugar,
1/2 c white sugar,
1 tsp salt, and
2 c vinegar in a small saucepan.
I used equal parts balsamic and raspberry red wine vinegar, and tossed in a handful of frozen raspberries to amp up the berry flavor.

Heat on medium–high, stirring occasionally, until sugar is dissolved, then boil for about a minute.
Scoop out the raspberries (don’t toss them, they’re amazing over vanilla ice cream), then pour the hot vinegar mixture over your rhubarb and screw the lid on the jar.
Refrigerate for at least two hours, or up to one week, and enjoy!

- Pickled Rhubarb and a Couscous Salad:
Couscous Salad with Grapes, Feta, and Pickled Rhubarb
2 cups dried couscous (I used Bob’s Red Mill whole wheat couscous)
3 tablespoons good, fruity olive oil
1 tablespoon lemon juice
1/2 teaspoon salt
1/4 teaspoon freshly-ground black pepper
1/2 cup diced pickled rhubarb*
2 cups halved red grapes
1/3 cup chopped parsley
6 ounces brined feta, crumbled
1 teaspoon red pepper flakes (optional)

Prepare couscous according to the instructions on the package.
Pour the cooked couscous into a large bowl.
Dribble with olive oil and lemon juice, then sprinkle with salt and pepper.
Toss lightly with a fork, making sure to not mash the couscous.
Add pickled rhubarb, grapes, parsley, feta, and red pepper flakes (if using).
Toss lightly again, and adjust seasoning to taste. Serve immediately.
'via Blog this'

Tuesday, 25 April 2017

Wild garlic pesto.


How to make wild garlic pesto
Ingredients

100g wild garlic leaves
50g parmesan cheese
50g toasted pine nuts
1-2 tablespoons of olive oil
lemon juice
salt and Pepper
Method
Wash wild garlic leaves thoroughly.
Place the leaves, parmesan, olive oil and nuts into a food processor and blitz.
You could also do this with a pestle and mortar if you want to be more traditional.
Add further oil if you wish to have a thinner texture and mix.
Add in your salt, pepper, and lemon juice to taste.
Wild garlic pesto is fantastic mixed with fresh pasta for a simple dish but its great on its own for dipping your favourite nibbles into.

OR:
wild garlic, 1 large bunch, washed
curly parsley, 1 small bunch, washed
60g of pine nuts, toasted
60g of Parmesan
150ml of olive oil, (I mixed half extra virgin, half normal)
1 dash of lemon juice
salt
black pepper

Place all the ingredients into a food processor apart from the olive oil and blitz for a minute or two then slowly pour in the olive oil until blended. Use for pasta, mash, dipping, and so on.

OR:
Wild garlic pesto.
Makes 1 small jar
50g wild garlic leaves, washed
30g pinenuts, lightly toasted
30g Parmesan cheese, freshly grated
80ml olive oil, plus extra to cover
Sea salt and freshly ground black pepper

The simplest method is to put everything except the oil in a food processor, blitz for a few seconds, then continue to whiz while slowly adding the olive oil through the funnel.
Transfer to a jar, pour sufficient olive oil on top to keep the pesto covered, close the lid and store it in the fridge.
It will keep for several weeks as the top is covered with a layer of olive oil.
'via Blog this'

Saturday, 22 April 2017

Bread.

- Mia’s Freshly Baked Poolish Bread – The Beat That My Heart Skipped:
‘Poolish’ is an amazing bread that be made with a miniscule amount of bakers yeast.
It is the one dough that can’t be kneaded by hand – it’s just too wet and sticky, so this is a great recipe for a busy person it just takes some preparation beforehand.
It’s the wet dough that results in a nice crusty holey bread.
Poolish bread also has some of the lovely flavours of sourdough so is really tasty eaten on it’s own with butter.

Dough won't hold shape.
For example: I want a rye loaf.
Do I want it 20% rye (of the flour) or 40%? I decide on 35%, say.
So now I know my flour (by weight) will be 35% Rye and 65% white.
Hydration: I want 68% which will have good oven spring in a tight shape when proofed in a basket.
I want my loaf to weigh 680 grams (1.5 lbs).
I am baking 10 loaves.
So I know the total weight is 680 * 10 loaves = 6,800 and I know of that the flour will be 6800/165 (divisory parts because its 65% hydration, if it were 70% hydration the divisor here would be 170 not 165) * 100 (because flour is always the baseline of 100%, called 'baker's percent') = 4121 of which 35% (1442) is Rye and the rest (2677) is White, and the water is the remainder of the total weight (= 6800 - 4121 flour) or calculated separately 6800/165 (65% divisor) *65 (the hydration level for water of 65% versus the flour which is 100) = 2679.

- Techniques | Paul Hollywood:

- Bread Baking Clinic: Under-Kneading & Over-Kneading | Kitchn:

- How To Make Bread | Kitchn: "Poolish"

- Bake Bread! 20 Tips, Tricks, & Ideas for No-Knead Bread | Kitchn:

- The Fundamental Techniques of Classic Bread Baking's Poolish Baguettes Recipe | Serious Eats:

- Baking SOS: How to solve 10 common bread problems by Luis Troyano | BBC Good Food:

- My Best Sourdough Recipe | the perfect loaf:

- Transferring from banneton to hot iron dutch oven | Stella Culinary:

- Tips on handling high hydration dough – Weekend Bakery:

- Mia’s Freshly Baked Poolish Bread – The Beat That My Heart Skipped:

- Baking with Steam in Your Home Oven | the perfect loaf:

- Recipe Index:

Friday, 21 April 2017

Kefir bread.

From Carl Legge.
"I’ve previously posted about this here.
But for these loaves I changed the process slightly.
I made plain white bread using Shipton Mill No 4 flour as I wanted to make bacon sandwiches the next morning.
White bread is always best for bacon"

This makes enough for 2 loaves of approximately 750g each.
Ingredients
Poolish
Live strained kefir 285g
Strong white flour 215g
Date syrup (or honey) 50g

Dough
Poolish from above 550g
Strong white flour 650g
Fine sea salt 15g
Warm water 280g

Method
Start the poolish the afternoon before you want to bake.

Mix all the ingredients together in the bowl you’ll mix the dough in (saves on washing up).
Cover with plastic or a damp tea towel.
Leave in a warm place until the next morning.
The date syrup or honey gives the kefir a quick sugar rush to get the leaven started.
By the morning, you should see the poolish slightly bubbly.

Then add the other ingredients and knead in your Kenwood Chef or similar for 6 minutes or do it by hand.

Cover again and allow to rest for 2 hours or so.
Then fold as I show you in this post for pain de campagne.
Two short folds at intervals of approx 1 hr rather than intensive kneading are adequate to give the dough shape and structure.

Cover and rest for an hour: fold again.
And finally cover and rest for another hour and then fold.
Cover and rest for an hour.

Divide the dough in two.
Shape to your fancy – there’s some shaping tips in a video in the pain de campagne recipe above.

Allow to prove for about a couple of hours.
And while this is happening, preheat your oven to 230°C.

Slash the bread artily.
Bake the bread for 15 minutes at 230°C with some boiling water in a tray at the bottom.
Then take out the tray, turn down the oven to 190°C and bake for a further 30 minutes.

OR in cup:
Sponge
1 1/4 cups of drained kefir milk (no kefir grains left in)
1 1/5 cups strong white bread flour
Scant 7 tbsp warm water
Scant 3 tbsp honey

Dough
2 1/3 strong white bread flour
2 1/2 plain or all purpose flour
3 tbsp of olive oil or similar
1 tbsp fine sea salt
(scant 7 tbsp warm water may be needed)

230 Celcius is about 450 Fahrenheit
190 Celcius is about 375 Fahrenheit

Thursday, 20 April 2017

Radish Leaf Pesto.

Radish Leaf Pesto Recipe | Chocolate & Zucchini:

'via Blog this'

Whole Roasted Carrots.

- Whole Roasted Carrots - Mark Bittman:

'via Blog this'

Spring minestrone. By Rachel Roddy.

- Rachel Roddy’s spring minestrone with basil pesto reicpe | A kitchen in Rome | Life and style | The Guardian:
‘Today’s recipe is for minestrone, a big spring soup,’ says Rachel.
‘This is one of 10 recipes I make all the time, varying it according to what is available.’

Spring minestrone
Serves 4
1 onion (ideally white)
2 celery stalks, with leaves
1 small fennel bulb
6 tbsp extra virgin olive oil
Salt
1 potato (around 100g)
100g green beans
A parmesan rind
1 litre water
1 courgette
200g white beans, cooked
150g peas (preferably fresh)

For the pesto
50g basil
30g pine nuts or almonds
100ml olive oil
1–2 garlic cloves
50g parmesan or pecorino, grated

1 Peel and finely slice the onion, along with the celery and fennel.
In a large heavy-based pan, warm the olive oil over a medium-low heat, then fry the onion, celery and fennel, along with a pinch of salt, until they start to soften – about 5 minutes.

2 Peel and dice the potato, then trim and chop the beans.
Add both to the pan – cook for another few minutes, stirring to make sure nothing catches.

3 Add the parmesan rind and water. Bring to a gentle boil, then reduce to a simmer for 15 minutes.
Dice the courgette, add to the pan, and simmer for another 15 minutes.
Add the white beans and cook for another 10 minutes, adding the peas when you think best.
Taste and add salt as necessary.
Take off the heat and set aside, ideally for at least an hour.

4 Meanwhile, make the pesto.
Pulse the basil, pine nuts, olive oil, and garlic together in a blender until you have a paste, then stir in the cheese.

5 If the soup has become too cool, re-heat it very gently, then divide between bowls, topping each one with a spoonful of pesto.

Minestrone. By Rachel Roddy.

Minestrone is a moveable feast in Italy, varying from one region to the next.
One thing’s a constant, though: it’s a chorus of vegetables, cooked slowly over a low flame.
- Winter Minestrone with Farro and Beans | rachel eats:
serves 6
Rachel Roddy's Adapted from the Riverford Farm Cookbook by Guy Watson and Jane Baxter.

5 tbsp good olive oil
1 onion finely chopped
1 leek finely chopped
1 celery stalk finely chopped
2 carrots peeled and chopped into small dice
2 turnips peeled and chopped into small dice
2 cloves garlic peeled, crushed with back of knife and chopped
400g tin of plum tomatoes
425g borlotti or cannellini beans drained
200g farro soaked in cold water for 1 hour and drained
water or stock
a parmesan rind
salt and freshly ground black pepper.
Good olive oil and freshly grated parmesan to serve.

Gently warm the olive oil in a large heavy based pan and add the chopped vegetables (onion,celery, leek, carrots, turnips but NOT garlic yet) add a sprinkle of salt, stir well to coat the vegetables in oil, cover the pan.
Cook slowly for about 30mins or until the vegetables are soft and slightly caramelised.

Add the garlic and cook for another 2 min’s.

Stir in the tomatoes and then allow everything to bubble away for about 10 minutes.

Add the beans, farro and parmesan rind, cover with water (or stock if you so wish) and bring the pan to a gentle boil.
Reduce the pan to a lively simmer and leave bubbling away for 30minutes or until the farro is tender.

Season the minestrone and add more water if you feel it is too thick.

Allow the minestrone to rest for at least 30 minutes, allowing the flavours to mingle and develop before very gently reheating and serving minestrone in warm bowls with a dribble of raw oil and freshly grated parmesan.

Friday, 14 April 2017

Vietnamese Meatball and Sweet Potato Noodle Bowl.

Half Baked Harvest - Made with Love:
Ingredients
1 pound ground chicken
4 tablespoons sesame oil
2 tablespoons low sodium soy sauce
2 tablespoons fish sauce
2 tablespoons honey
1 lemongrass stalk, chopped
2 medium sweet potatoes, spiralized or cut into matchsticks
4 cups low sodium chicken broth, steaming (optional)
2 carrots, shredded
1 Persian cucumber, sliced
1 mango, cut into match sticks
cilantro, mint, limes, pickled ginger, and sesame seeds, for serving
2-4 tablespoons sweet Thai chili sauce, more or less to your taste (optional)

Instructions
1. Roll the chicken into 20-30 tablespoon size meatballs, place each meatball on a tray as you work.
2. In a small bowl, combine the 2 tablespoons sesame oil, soy sauce, fish sauce, honey and lemongrass.
3. Heat a large skillet over medium heat and add the remaining 2 tablespoons oil.
Add the spiralized sweet potato and give it a good toss.
Cook, stirring often until the noodles have softened, but are not mushy, about 5-8 minutes.
Season with salt and pepper.
Remove the noodles from the skillet.
4. Return the skillet to medium heat.
Add the meatballs and cook until cooked through, about 5 minutes, turning them 2-3 times throughout cooking.
During the last minute or so of cooking, add the sauce and give the meatballs a good toss through the sauce.
Cook another minute longer, until the sauce glazes the meatballs.
Remove from the heat.
5. To assemble, divide the noodles and meatballs among bowls and ladle the steaming broth over top.
Top each bowl with carrots, cucumbers, mango, cilantro, limes, ginger, and sesame seeds.
Serve with chili sauce.
Enjoy!
'via Blog this'

Wednesday, 5 April 2017

Spicy Thai Chicken Broth.

Spicy Thai Chicken Broth – Amelia Freer:

1ltr chicken stock
2 stalks of lemon grass
4 kafir lime leaves
15g ginger, peeled and thinly sliced
1 birds eye chili, sliced
1-2 tbsp fish sauce
Juice of 1 or 2 limes
2 poached chicken breasts, shredded or diced
2 heads of bok choy, leaves separated
1 red pepper, sliced
1 carrot, finely sliced
2 spring onions, sliced
small bunch of coriander or Thai basil leaves, roughly chopped

Step-By-Step
Lightly smash the lemon grass with a rolling pin so it is broken but still whole.
In a pan heat, lemongrass, stock, lime leaves, chilli and ginger, bring to the boil, turn down the heat and simmer for 5 minutes.
Remove the lime leaves, ginger and lemon grass and add the fish sauce, carrot and pepper, simmer for 5 minutes then add the chicken, bok-choy and spring onions, simmer for 3 minutes.
Check for flavour balance as you may need to add a little more fish sauce or lime.
Serve with a generous topping of fresh herbs.
If you like your Thai food spicy, serve with extra chopped chilli.
'via Blog this'

Thursday, 30 March 2017

Panang chicken stir-fry.

BBC Food - Recipes - Panang chicken stir-fry:
By Mary Berry.
Spice up your rice with Mary's chicken stir-fry, perfect for a midweek meal.
Ingredients
225g long-grain rice
2 tbsp olive oil
2 chicken breasts, very thinly sliced into strips
1 tbsp clear honey
1 onion, chopped
1 medium courgette, finely chopped
1 red pepper, finely chopped
2 sticks celery, finely chopped
2cm piece fresh root ginger, finely grated
2 garlic cloves, crushed
1 tbsp medium curry powder
3 tbsp soy sauce
1 tbsp sweet chilli sauce
½ lime, juice only
4 lime wedges
salt and freshly ground black pepper

Method
Bring a saucepan of water to the boil and cook the rice according to packet instructions (about 10–12 minutes).
Drain well, rinse and set aside to cool completely.

When the rice is cool, heat the oil in a frying pan, season the chicken strips with salt and pepper and add to the pan.
Drizzle with the honey and fry quickly over a high heat for a few minutes until golden and just cooked.
Remove from the pan and set aside.
Add the onions, courgette, pepper and celery to the pan.
Fry for 4–5 minutes, stirring.
Stir in the ginger, garlic and curry powder and fry for another minute.
Add the rice, soy sauce, chilli sauce and lime juice.
Toss together and season with little salt and pepper.
Return the chicken to the pan.
Spoon into hot bowls and serve with the lime wedges.

Recipe Tips
- For the best result, make sure the rice is cooked and cooled beforehand so it won't stick together when frying.
- The rice can be cooked up to 6 hours ahead and stored in the fridge.
- Soy sauce can be a little salty so go easy with extra seasoning.
- Homemade curry powder:
2 tablespoons ground cumin
2 tablespoons ground coriander
1 dessertspoon ground turmeric
1/2 teaspoon cayenne/ chilli powder
1/2 teaspoon mustard seed
1/2 teaspoon ground ginger
In a blender or food processor, combine all ingredients.
Process to a fine powder.
Store in an airtight container.
When grinding your own spices the flavours are enhanced by briefly "toasting" them first.
That is, heating them over the stove in a dry skillet until they begin to brown and their rich aroma begins to be released (but don't overdo it!).
Makes grinding them easier too.
'via Blog this'

Sunday, 26 March 2017

Wild garlic spelt risotto.

Mark Hix recipe: Wild garlic spelt risotto | The Independent:
Mark Hix recipe:
This tasty, cheap dish makes a great starter or vegetarian main course.
The puréed wild garlic comes into play here, giving the risotto a vibrant green colour.

1 large onion, peeled, halved, finely chopped
2tbsp olive or rapeseed oil
160-180g spelt, soaked in cold water for a couple of hours
1.5ltrs vegetable stock, or a couple of good stock cubes dissolved in the same amount of boiling water
A handful of wild garlic leaves and stems, washed and roughly chopped
A couple of tbsp of wild garlic purée
80g unsalted butter, diced

For the wild garlic purée

2-3 handfuls of wild garlic leaves and stems, washed and dried
120-150ml rapeseed oil

First make the purée: simply blend the wild garlic in a liquidiser with the rapeseed oil, until smooth, then it can be stored in a sterilised preserving jar in the fridge for up to six months.

Heat the oil in a heavy-based saucepan and gently cook the onion for 2-3 minutes, without colouring. Drain the spelt and add it to the onion; season, then gradually add the stock, ensuring each addition has been absorbed before adding the next.

Cook for 15-20 minutes, until the spelt is tender but not too soft. Add a couple of tablespoons of the purée, the wild garlic and the butter. The risotto should be a little sloppy; add more stock if you need to and season to taste. Serve immediately.

'via Blog this'

Scones with fresh ramps & cheese.

Scones with fresh ramps & cheese – An old favorite goes savory » delicious:days:
Savory scones have been on my to-try-list for ages, but it took my Küchengötter-colleagues’ request for a recipe with fresh ramps (wild garlic) to bring those two together.
Having tried different recipes with ramps over the last week, I was full of confidence that my all-time favorite recipe for sweet scones would play along nicely, still, I didn’t expect the outcome to be that awesome.
I had just dropped off some of the new creation with ramps and cheese at my friend Kristin and she called me, still chewing on the last bite: “These are SO good!”
So if you are looking for a no-fuss appetizer to start a typical spring menu, this is it.
Prepared in no time, best served with your favorite butter (find this scones recipe in German over at Küchengötter).

Ingredients (9 scones):
200g all-purpose flour, plus more for handling the dough
1,5 tsp baking powder
1 tsp fine sea salt
25 g freshly grated parmesan cheese
about a handful of fresh ramps (~15 g chopped)
60g cold butter
~130g milk
for brushing: 1 egg yolk and 1 tbsp milk
3-4 tbsp freshly grated cheese (e.g. parmesan, pecorino, mountain cheese)

Line a baking tray with parchment paper and preheat your oven to 220°C (425° Fahrenheit).
Wash ramps, pad dry and finely chop the greens with a large knife (~15 grams).

The dough can easily be prepared with a food processor:
Add flour, baking powder, salt, grated parmesan cheese and the chopped ramps to the bowl, then mix until evenly distributed.
Now add the really cold butter in cubes and pulse for a couple of times until you can spot no butter pieces that are larger than small peas. Lastly add the milk and pulse shortly, just until the dough comes together.

By hand: In a large bowl, mix together flour, baking powder, salt, grated parmesan cheese and the chopped ramps. Cut the really cold butter into small cubes and add them to the dry ingredients using a pastry cutter or your fingertips to rub it in until there are no butter pieces that are larger than small peas.
Finally stir in the milk with a spoon until the dough comes together and doesn’t show big nests of dry flour anymore.

Dump the rather sticky dough onto a well floured board, generously sprinkle with flour and knead very shortly to ensure a fluffy crumb (overkneading results in tough scones), then form into a square (~14 cm*14 cm/5,5 inch), about 3 cm (~1,25 inch) thick. Use a long knife to cut it into 9 equally sized squares (dipping the knife edge into flour after each cut makes it easier).

Place the scones onto the prepared baking tray.
Lightly beat the egg yolk with one tbsp of milk and brush the tops of the scones before topping them with some grated cheese.
Bake on middle level for 12 to 13 minutes or until nicely browned.
If the cheese topping still lacks color after 10 minutes you might want to turn on the oven’s grill feature (but watch closely!).
Let cool on a wire rack or serve while still warm.
'via Blog this'